| 3RD QTR 2015 |
 •
•
 •
•
 •
•

|
| 07/01/15 - 1.5 hrs Got some Evercoat Rage Gold polyester based body filler to start filling and contouring the various sections of the wing prior to varnishing. Used the product datasheet and my jeweler's scale to figure out a mix ration by weight so I can mix small quantities of the bondo consistently. After some trial and error I have settled on adding cream hardener at 1.4% of the filler weight, or filler weight X .014 = hardener weight, which ensures a quick solid cure, but means I also have to work fast! I am only able to measure such small amounts because the jeweller scale is accurate with low weights. Got some filler on the bottom side of the center section.
| |
| 07/07/15 - 1.5 hrs More filling and sanding on the center section.
| |
| 07/08/15 - 2.5 hrs Got the bottom of the center section just about finished. Just have a couple little spots that I'll fill when I start working on the midspan leading edge scarf joints.
| |
| 07/12/15 - 2.7 hrs Did some touchup on the center section and got that bottom side where I'm happy with it. Moved on to the midspan LE scarfs and got them pretty close. My technique is now refined: 1) Spread bondo 2) While its still soft, skim the high areas down with a surform 3) Once its too hard for the surform, switch to a vixen file 4)Sand until happy or more filler needed with 280 grit sanding board. I keep the sandpaper from clogging by blasting it clean with compressed air.
| |
| 07/14/15 - 3.6 hrs Roughed up the fiberglass wingtips so the bondo will stick. Mixed up a big batch of bondo and applied it to the right wingtip top side. Also filled the little spots left on the midspan LE scarfs. Got the top side of the right wingtip where it just needs minor filling.
| |
| 07/26/15 - 3.0 hrs Started first layer of filler on top of left wingtip and worked it until I got it pretty close, as well as more work on the top of the right wingtip which is pretty close also. I am taking my time with the wingtips because they are complex curves and the thin fiberglass makes for slow sanding. I have to sand with very light pressure, otherwise the fiberglass flexes with any pressure and makes getting a proper contour impossible.
| |
| 08/01/15 - 3.7 hrs Did more sanding on the wingtips, got them pretty close to final shape except for minor spots that need filling. Decided to work on setting the gap around the tank cover about .040" so the first layer of fabric can be tucked in under the cover. I used a cabinet scraper and sharp wood chisel to draw file the vertical edges of the wing around the tank bay so my scrap of sheetmetal would slide all around. Once that was done I applied the first layer of bondo to the topside center section leading edge scarfs.
| |
| 08/03/15 - 1.6 hrs Taped off the gap around the tank cover to keep bondo out of the gap I just worked on. Then applied the first layer of bondo at the center section leading edge scarfs. While that was curing I did more filling and shaping on the wingtips.
| |
| 08/09/15 - 2.0 hrs Got top halves of center leading edge scarfs sanded to final shape. Started work on filling the slight steps down from the leading edge ply to each rib. I short section of bondo is laid on the rib up to the leading edge ply then sanded to a smooth contour.
| |
| 08/10/15 - 2.1 hrs Used blue tape to make temprary molds along the edges of the ribs to be filled, also taped off the areas at the tanks ribs for filling. Mixed up bondo and laid it into the tape molds on the ribs. Right away after the bondo started to cure the tape was pulled off and the surform tool was used to cut the bondo down to rough shape while the bondo was still soft.
| |
| 08/12/15 - 2.0 hrs Spread bondo on the trailing edge areas, areas at the forward inner corners of the ailerons, as well as the aft corners of the center tank cover.
| |
| 08/13/15 - 3.2 hrs Sanding previously filled areas to shape.
| |
| 08/17/15 - 2.0 hrs Decided the best way to contour the hand hold was to add a ply filler strip to match the rest of the ply on the wing. Also added some bondo to easy the fabric transition at the aft cabane fittings.
| |
| 08/24/15 - 2.4 hrs Mixed up some EV-400 epoxy varnish, and while it was cross linkng for 30 mintues, I started masking off the metal parts on the wing that will not get varnished. Then I brushed the EV-400 into the nooks and crannies of the rib gussets, areas that I thought would be tough to get with the spray gun later.
| |
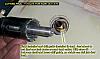
| 09/15/15 - 1.7 hrs Decided to locate and put the holes on the tank bay for the four fuel outlets. I cut some points into some brass plugs and put them into the tank outlets, then put the tank in position. The points then dented the tank bay bottom skin. I then drilled small pilot holes and enlarged them to 3/8. I then used a 1 inch hole saw to enlarge them out to the diameter of the socket needed to tighten up the finger strainers. Although they will be installed prior to cover and small holes in the fabric only for the fuel fittings, having the ability to remove and replace the strainers later is essential.
| |
| 09/17/15 - 1.5 hrs Cut and applied one inch 1/8" thick adhesive felt on the strap lines of the fuel tank, then I mounted it in the wing and tightened up the strap turnbuckles a bit. On the lathe, I drilled a 3/8" hole in a brass plug, then used it as a drill guide to make the final adjustments to the holes after the tank was mounted in its final position. Using the hole saw with the shaft guided by the hole in the brass plug, I was able to put the final cut of the holes in the skin.
| |
| 09/19/15 - 2.3 hrs Made a cardboard template to figure out where to cut the holes in the tank cover for the fuel filler neck and vent line. I then transfered the locations and cut the hole in the cover with a two inch hole saw. I cut the vent hole with a multi-step drill bit.
| |
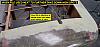
| 09/20/15 - 1.5 hrs First of all, before installing the final center ply skins, I should have drilled drain holes in the tank and rib bays to allow for future condensation to drain out of the wing. So, using various methods shown in the pictures, I was able to locate and drill the needed drain holes. I then varnished them.
| |
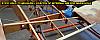
| 09/21/15 - 1.8 hrs Also when putting the spar cap strips on, I should have left gaps to act as drains on the bottom low corners. Since I didn't at the time, I drilled holes in the spar caps in the proper locations to act as drains from the leading edge nose rib bays into the main rib areas. I had to be careful to not drill into the spar or break through the leading edge ply.
| |
| 09/25/15 - 1.5 hrs Used a long 1/8" drill bit and some guides to drill drains for the nose rib areas in the center section.
| |
| 09/28/15 - 2.0 hrs Drilled drains from the tank bay into the aft center section. I then varnished all the drain holes I put in. Then I finished masking the wing and got it ready for spraying.
| |
| 09/30/15 - 3.5 hrs Mixed up some epoxy varnish and sprayed the first coat on the wing. EV-400 was mixed with EV-410 catalyst at a two to one ratio and allowed to cross-link together for 30 minutes before adding E-500 reducer to thin for spraying. The reducer is added at 25 percent of the quantity mixed already. I also used an HVLP spray gun with the controls adjusted to spray a tight circle for the rib sections and a fan spray for the leading edges and tips.
| |
| Quarter Total 49.6 hrs / TTD 1610.5 hrs | |
| 3RD QTR 2015 |
•
•
•
|