

| 2ND QTR 2001 |
 •
•
 •
•
 •
•

|
| 04/01/01 - 0.5 It was my 40th b-day today and I celebrated by racing 20 yr old kids at the motocross track. I only finished mid pack, but it was still fun. Afterwards my brother Kevin helped me do the bend at FS 75.75
| |
| 04/13/01 to 04/17/01 - 3.7 Cut and Fit tubes 210-12, inner diagonal 210-70 and tubes 210-11. Tack welded all but the -11 tubes, since I want to keep them "removable" for fitting of other tubes right now.
| |
| 04/18/01 to 04/20/01 - 2.5 Cut and Fit tubes 210-14 and inner diagonal 210-81. Tack welded in place. | |
| 04/24/01 - 2.0 Cut and Fit and tack welded tubes 210-15. Jigged the upper longerons at the tailpost for fitting later and rigged some wires to hold the bottom ladder tight against Jig Box 6, I have a thin piece or cardstock under one tube to level the fuselage there.
| |
| 04/25/01 - 2.9 C & F tubes 210-16. I had first do-over on fitting tubes, one of the -16's was a little too short somehow, so I made another. My scrap heap still fits in a 1 gallon plastic jug though, so I'm not doing too bad. In the morning I fitted 210-71 in and tack welded all three tubes in. No more jig boxes! Building top and bottom ladders compared to sides has worked out very well so far.
| |
| 04/27/01 - 1.2 Cut and Fit tubes 210-17 and tacked them in. Now need to fit longerons at tailpost next. | |
| 04/30/01 - 1.0 Fit upper and lower longerons to tailpost, using cutoff tool. | |
| 05/01/01 - 1.6 First of all, I went riding Mines Road with my friend Bob from San Antonio, who was visiting. Later that day, I made the tailpost, out of 1.00 x .049 and drilled hole for lower rudder hinge and notched one end for the tailspring tube. Tailpost is longer than needed right now so it can be secured to the table better. I'll trim it off after the fuselage is tacked. Note my tailpost is not .035 like plans show, otherwise the .875 x .035 tail fin would get pretty wiggly inside it.
| |
| 05/03/01 - 1.5 Cut and Fit then tack welded tubes 210-18 in.
| |
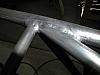
| 05/05/01 - 2.8 Cut and Fit tube 210-21. Then welded the inner joints of tubes 210-18 at the tailpost, while tube 21 is not in the way yet. I was told this part of the fuselage is the most difficult to weld and it certainly tested my patience. Mostly because the tubes are so close together and meet the tailpost at such a shallow angle. It seemed impossible to get a nice bead in the tight part since I couldn't get the torch in like I wanted to, even with the small cup. These are not pretty welds but are the best I could do. No shortage of filler here!
| |
| 05/08/01 - 0.7 Did some more welding in the tailpost area that would be very difficult to do after the tailspring tube is installed.
| |
| 05/09/01 - 2.0 Got the gear bushings located properly. I slipped a 1.125 tube over the tailpost to clamp my tape measure to. Using sway plate as a guide and measuring from tailpost, I used the die grinder to enlarge the bushing holes. I also bolted the bushings to the clamp bars and set them on the sway plate to hold them for tack welding.
| |
| 05/10/01 - 1.7 Made some adjustments to the bushings to get them more parallel in the vertical. Tack welded them in. Also tacked the -21 tube in. Except for the tailspring tube -22 which I'll put in later when I get the tailspring the fuselage is all tacked and ready for finish welding.
| |
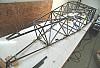
| 05/11/01 - 0.5 Cleaned up the table, removed pipe clamps from table. Took progress pictures. Note the tailspring tube is just sittin' on the tailpost. Warning the first picture is big, 256K so it may take awhile for download.
| |
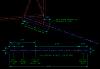
| 05/22/01 - 0.5 Dug up a CAD drawing I got from Tom that showed the correct fuselage welding sequence. Made a gif of it and put it on the website for reference when welding. | |
| 05/23/01 - 1.5 Used oxy/acet torch and small hammer to taper longerons into tailpost. Got landing gear spring and test fit ok after very minor file work.
| |
| 05/24/01 - 2.5 My dad came over and we set up the 2wings to give Ryan a ride (that's what he calls biplanes....2wings). Then we built a support for one side of the fuselage, and modified an engine stand for the other. This arrangement allows the fuselage to be rotated for welding and to be wheeled around the garage too.
| |
| 05/25/01 - 2.0 Welded joints 1 upper and 2 lower on tailpost according to the Weld Sequence
| |
| 05/26/01 - 1.5 Welded joints at tailspring crossmember and joints 3 and 4 (see weld sequence)
| |
| 05/27/01 - 1.8 Welded joints 5 and 6
| |
| 05/29/01 to 05/31/01 - - My dad and I flew to Seattle, and drove my wings down in a friends pickup truck.
| |
| 06/05/01 - 1.5 Welded joints 7 & 8 | |
| 06/06/01 - 1.7 Welded joints 9 & 10 | |
| 06/07/01 - 1.4 Welded joint 11
| |
| 06/08/01 - 2.0 Went over to Ken's and drilled the two .25 holes in the tailspring. Since the spring is hardened spring steel we used the following method to make the holes. First we started the hole with a Drill / Countersink, which didn't walk around like a regular twist drill would. Then we just drilled the hole right through with a 0.25 (Letter "E") Solid Carbide Straight Flute Drill, which is designed for metal with high Rockwell Hardness numbers. We also used cutting fluid along with relatively high speed and feed, the curls were flying.
| |
| 06/09/01 - 3.3 Drilled holes in the 210-22 tailspring tube to match the spring. Then notched it to fit the fuselage making sure to keep everything perpendicular. I used a 3/16 rod to help me align everything, then welded it in.
| |
| 06/14/01 - 1.6 Welded joint 12 | |
| 06/15/01 - 2.5 Welded joints 13 and 14 | |
| 06/16/01 - 1.8 Welded the smoke tank tube and part of joint 15
| |
| 06/20/01 - 1.4 Finished joint 15 and started on 16. | |
| 06/21/01 - 0.5 Finished joint 16 | |
| 06/27/01 - 1.6 Finished joint 17, a little of 18 | |
| 06/27/01 - 7.0 Went over to Ken's and used his lathe to cut all the bushings, and short tubes for the fuselage, tail feathers, etc, where accuracy or a good square cut would be nice. See the Lathe Cut List
| |
| 06/28/01 - 4.0 Welded clusters 18 and 19. Went over to Ken's and bead blasted rust off some of the laser cut parts. Worked on a drawing for the bearing cages and the assembly / weld plugs I'll make tomorrow.
| |
| 06/29/01 - 6.5 Made two bearing cage assembly plugs over at Kens. The plugs keep the middle spacers centered and absorb heat when doing the plug welds. Also drilled the outer spacers for the plug welds and reamed them for good bearing fit. Welded one of them together to test fit, bearing works well. Welded joint 20.
| |
| 06/30/01 - 1.2 Welded joint 21
| |
| Quarter Total 67.9 hrs / TTD 256.5 hrs | |
| 2ND QTR 2001 |
•
•
•
|


")


