


Cabane Fitting Jigs
Using a Kimball fuselage as a master guide, I made a set of jigs for locating and welding the 4 sets of cabane fittings on the fuselage. It is important to note that the cabane struts are of fixed length, so the fittings must be set correctly. Otherwise, the upper wing must be set in position and custom length cabane struts fitted. Using the jigs allows me to use the cabane struts I bought from Kevin preassembled.
Normally, these jigs will are available for use by other builders. To find out their current location contact me.


Building the Jigs


Installing the Fittings
So you're just about to start putting the cabane fittings on your fuselage, and have some questions. Maybe the following discussion with Kevin will help....
 QUESTION: Kevin, you can see where I'm at on this, but I'm a little unsure how to proceed. If you don't mind, could
you please give me a step-by-step on how you would put these things on? I will include your instructions with the jigs when they
get passed on to the next builder.
QUESTION: Kevin, you can see where I'm at on this, but I'm a little unsure how to proceed. If you don't mind, could
you please give me a step-by-step on how you would put these things on? I will include your instructions with the jigs when they
get passed on to the next builder.
ANSWER: Here is how we do it. We bolt all the cabane fitting parts to the jig (ours is one jig that holds all at one time instead of 4 jigs like yours). Fit to the frame like you have them. All parts on though including the aft outers. The fitting tails will stick out a bit on the sides and up on the front inners. This is perfect. Edge seam weld as much of all the 2 ply areas from the bends up and around the bolts NOT on the rear outer tails at this time. You won't be able to do all the edges, but get at the front and back edges at least. Now the fitting assemblies are stuck together. Now use a C clamp to pull the front 2 outer tails tight to the vertical tubes. Tack across the bottom point end. Good strong tack. Now C Clamp the 2 rear lower pairs to the vertical tube and tack them good as on front ones. Here is where you get to use the gas torch rig. Use the rosebud tip to heat the 4 outer tails front and re ar and hammer form them to the curve of the tubes and tuck in at the longeron. We try to hit the fittings only on the edges where the welding will burn up the material so that the hammer marks will not show later. Next heat up the the top front .063 tail and form it down around the longeron and to the cross tube. Tack point and heat and form more if needed. Now weld up all you can with the jig on. Should get 90+% of it while jigged. Remove jig and finish welding.


QUESTION: Do these gaps just get filled in with mass quantities of filler rod?
ANSWER: Not Mass Quantities, but just what it takes to plug the end. Don't try to fill all the way thru the fitting gap.
| Step by step use of the Jigs | |
| DO NOT APPLY HEAT TO THE JIGS !!! They have been used to install several sets of fittings so far with no problems. If you are having problems getting fittings to fit, you have to adjust the bends in your fittings, or verify your fuselage has been built to proper dimensions. | |
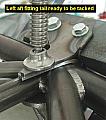
 First
I bolted the parts together and did some edge welding in areas that I knew
would be hard to get at after installation on the fuselage First
I bolted the parts together and did some edge welding in areas that I knew
would be hard to get at after installation on the fuselage
|
|
 I
then installed the fittings into the jigs with the bolts loose, then put
the jigs on the fuselage and tightened the bolts. The jigs won't go on the
fuse with fittings in tight. Ready for attachment to fuselage. I
then installed the fittings into the jigs with the bolts loose, then put
the jigs on the fuselage and tightened the bolts. The jigs won't go on the
fuse with fittings in tight. Ready for attachment to fuselage. |
|
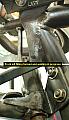
 Clamped
tails to vertical tube. Note that if the tails are not in alignment with
each other as shown here do not worry. This happens on occasion. Heat
the tails and bend them for or aft to get them aligned to each other and
the fuse tubing. Then tack and form followed by welding. Clamped
tails to vertical tube. Note that if the tails are not in alignment with
each other as shown here do not worry. This happens on occasion. Heat
the tails and bend them for or aft to get them aligned to each other and
the fuse tubing. Then tack and form followed by welding. |
|
 Tacked
tail to vertical tube, then heated and formed the tail of the fitting to
the tube with a hammer. Tacked
tail to vertical tube, then heated and formed the tail of the fitting to
the tube with a hammer. |
|
 Welded
up the fitting, filling gaps as needed. Completed edge welds. Welded
up the fitting, filling gaps as needed. Completed edge welds. |
|
 Pictures
of forward fittings Pictures
of forward fittings |
|