| 2ND QTR 2015 |
 •
•
 •
•
 •
•

|
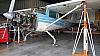
Lost a quarter of progress on the wing, but I've been busy with other aviation related things. I built a set of jacks to lift up my Cessna 152 so during this year's annual inspection I could inspect the landing gear without weight on it, and also replace the tires and brakes. After I got the annual done on the 152, I resumed work on the wing rotator stand.
| |
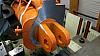
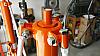
| 05/11/15 - 0 hrs Finished the wing rotator stand! The construction and completion of the stand can be seen here: Top Wing Rotator
| |
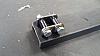
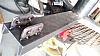
| 05/22/15 - 1.5 hrs At some point during the construction and test fitting process of making the wing rotator, I set the wing down on the sawhorses but missed a block of wood which then cracked one of the top curved sticks on a rib. Rather than do a tapered splice repair as per AC43.13 I decided to replace the cracked stick completely from leading edge to trailing edge, thus return the rib to as new state. This required careful removal of the old stick, so as to not damage the plywood gussets at each joint, or the spars or leading or trailing edges. To begin I created a custom dremel router bit with an aluminum sleeve to hold two bearings. The bit protrudes exactly .235 to make sure not to cut too deep. An aluminum clamp block was milled to match so the bit would not cut into the gussets when the bearings were held against the block.
| |
| 05/22/15 - 5.5 hrs Removed the old stick by using the router bit and clamp block to cut down to the staples, then using an abrasive cutoff wheel to cut the staples flush with the gusset edges. Then I was able to continue with the router bit to remove the stick between the ply gussets. After that I removed the staple remnants from the gussets and cleaned up the interior side of the gussets with some sandpaper.
| |
| 05/23/15 - 1.8 hrs Using a small right angle air drill and 1/8" bit, then a section of welding rod ground to a small chisel end, I tunneled under the plywood leading edge and over the spar to remove most of the old stick. I also cut away most of the stick inside the aluminum trailing edge. Being careful not to damage the spar top surface, I carefully removed the old stick wood and was able to get the new stick to extend into the tunnel almost as far under the ply eading edge as the original stick did. At the trailing edge I was able to get the new stick to go in until it hit the rivet there. I then cut the new stick a little long and sanded a taper into the aft end to get it fitting properly at the trailing edge. Then I trimmed the front end of the stick a little at a time until I found the proper length.
| |
| 05/26/15 - 0.7 hrs Did some final fitting of the new stick, then glued and stapled it in.
| |
| 05/28/15 - 1.0 hrs Cut and fit ply gussets for installation at the ribs that get carved out later for flying wire clearance. Glued and stapled them on the ribs.
| |
| 06/28/15 - 4.4 hrs Before today I was busy with other stuff and my annual camping trip while waiting for some Awl-Fair to arrive. Started installation of the wingtips by marking internal locations of spar ends with small sections or tape. Applied clear packing tape to the ribs and leading edges to make excess glue cleanup easier. For each wingtip I mixed up a big batch of awl-fair for the spar tips and some T-88 to glue the edge of the tip to the rib. I also added some micro ballons to the epoxy at the leading edge so it could fill the minor gaps there. I also applied the awl-fair pretty thick inside the wingtip and to the spar tips to make sure it filled the gap. I then held the wingtip in position with tape until the glue started to set. Then I removed most of the tape and excess glue from the joint. Before leaving it all to cure, I used some of the leftover awl-fair to fill the gaps at the aft edge of the fiberglass wingtip where it meets the spar.
| |
| Quarter Total 14.9 hrs / TTD 1560.9 hrs | |
| 2ND QTR 2015 |
•
•
•
|