|
2ND QTR 2013
|
 •
•
 •
•
 •
•

|
| DATE |
HRS |
TTD |
ACTION |
IMAGES |
| 04/19/13 |
2.5 |
1230.0 |
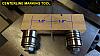
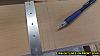
Using some scrap pine, some old bearings and a pen insert, I made a tool to draw centerlines down the
tops of the spars. My dad rode his motorcycle over and helped me mark all the rib centers on
the forward and aft spars. We also double checked our work! Afterwards I used my protractor set to
seven degrees to extend the rib centerlines on the tops of the spars. |
 |
 |
 |
 |
| 04/26/13 |
1.9 |
1231.9 |
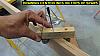
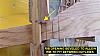
Made a couple of tools to help draw the rib outlines on the spars. Cut two strips of aluminum to match the rib thicknesses and then drilled
a series of holes exactly (using the DRO on the milling machine) down the middle of them. Started marking the rib centerlines around the
spars at the proper locations. |
 |
 |
 |
 |
| 04/28/13 |
1.5 |
1233.4 |
Finished marking the centerlines, then started marking the rib outlines using the tools made on the 19th.
Used a protractor set to 7 degrees to help align the outline tools on the tops of the spars. This is more work than expected! |
 |
 |
| 04/30/13 |
1.2 |
1234.6 |
Still drawing lines on the spars |
 |
| 05/01/13 |
2.0 |
1236.6 |
Finished marking the rib outlines.Noticed that the inboard truss ribs need their spar openings beveled a little to allow them to slide
closer into the spar splices. Afterwards I slid all the ribs onto the spars in their proper position. |
 |
 |
| 05/02/13 |
0.6 |
1237.2 |
Test fitting the -44 front spar doublers, they will have to be trimmed to alow the compression rib into position,
and so the top and bottom surfaces are co-planar with the top and bottom spar surfaces. |
 |
 |
| 05/02/13 |
4.0 |
1241.2 |
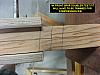
Drew pencil lines on the doublers to mark the proper cuts. Set the table saw to 7 degrees and cut the vertical edges so the compression
ribs can butt up against the doublers. Set saw to match the angle of the spar top/bottom bevel, then ripped the horizontal edges
of the doublers. Test fit the doublers, and then masked off the surrounding wood areas so glue will not make a mess. Pulled the
doublers off, mixed up some T-88 and glued them back on, followed by clamps and blocks. Lastly I cleaned the glue out of the
big flying wire pin hole, and the rest of the joint. I then removed the masking tape when the glue just began to harden. Left the
clamps on overnight. |
 |
 |
 |
 |
 |
 |
| 05/11/13 |
2.0 |
1243.2 |
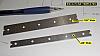
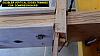
Made a replacement plywood doubler for the front side of the right aft spar splice that I had to cut off
so I could slide the center section ribs on. First I made up a drawing on autocad so I could figure out exactly
where to place the holes. I then cut a blank out of 1/4 ply. Using the DRO's on my milling machine I drilled
six 1/4" holes. I then used progressively bigger end mills until I had the center 3/4" landing wire pin
hole at the right size. |
 |
 |
| 05/12/13 |
1.2 |
1244.4 |
Test fit the doubler in place and drew pencil lines on it to mark where to cut the top and bottom edges
to match the rest of the spar splice. Mixed up some T-88 and glued the doubler in place. |
 |
 |
| 05/13/13 |
2.1 |
1246.5 |
Fitting the aft right cabane attach fitting. With the doubler added, the splice was a little too thick for the
the fitting to slide on, so I sanded each face of the doublers until it fit snugly.I then glued both ply doublers
to the forward right spar splice. |
 |
 |
| 05/14/13 |
0.5 |
1247.0 |
Removed clamps, test fit the front right cabane fitting. It fits good without adjusting
thickness of the joint. |
 |
| 05/15/13 |
1.0 |
1248.0 |
Glued up the forward left spar splice doublers. |
 |
 |
 |
 |
| 05/17/13 |
1.7 |
1249.7 |
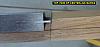
Got out the wood parts for the -40 and -45 aileron hinge doublers and test fit them to the spars. Set the table saw to the same
angle as the spar faces, then cut the ends of the -40's to mate with the -14 compression ribs. Then I drew lines along the top
and bottom edges of the doublers to know where to trim them to match the spars.I then trimmed the top edges on all the forward doublers |
 |
 |
 |
 |
 |
 |
| 05/18/13 |
1.9 |
1251.6 |
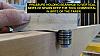
Finished trimming the doublers. Taped up the compression rib areas to keep glue off them. Glued the doublers
on the right wing. Todays pictures show how I mix epoxy using the jeweler's scale. I zero the scale with an empty cup, add some
hardener and note the weight. Multiply that weight by 1.204 to get the epoxy weight. I then zero the scale again and that weight of epoxy. |
 |
 |
 |
 |
 |
 |
| 05/19/13 |
1.3 |
1252.9 |
Removed the clamps and blocks from the right wing aileron doublers. Glued the -40 and -45 doublers on the left wing. |
 |
 |
| 05/22/13 |
1.7 |
1254.6 |
Glued on the -39 wing tank strap doublers. Masked off the faces of the spars to keep glue from making a mess on the spars. |
 |
 |
| 05/28/13 |
0.5 |
1255.1 |
Trimmed the excess wood to make the -39 tank strap doublers flush with the aft spar top and bottom faces. |
 |
 |
| 05/30/13 |
4.4 |
1259.5 |
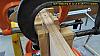
Flipped the wing over to work on the bottom spar caps, first the -41 and -43 strut area ply caps on the right wing.
Cut some 1/4 rod and greased them to keep the spar caps aligned when gluing. Used the table saw and a belt sander to trim the spar caps to
fit perfectly. Cut some angle blocks for clamping. Glued the two right wing strut caps on. Later that day I glued the Left ones on. |
 |
 |
 |
 |
 |
 |
| 06/02/13 |
2.0 |
1261.5 |
Removed clamps, sanded the caps of excess glue and cleaned out the I-strut hole with a 1/4" reamer.
Moved on to the -46 center spar splice caps. Trimmed them to fit and put tiny nails into the spar splice to ensure they are in correct position
when glued. I then glued the front spar caps in and stapled them to make sure they stay in position while glue cures. |
 |
 |
 |
 |
 |
 |
| 06/05/13 |
1.2 |
1262.7 |
Glued the aft spar -46 bottom caps on. |
 |
 |
| 06/07/13 |
1.1 |
1263.8 |
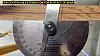
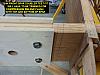
Sanded and cleaned up the holes in the rest of the I-strut are caps. Marked and removed layers of plywood from
the left wing aft -46 cap so the cabane fitting will fit into its proper position.What caused the small divot in the cap?
I tried using my power planer set on the smallest increment 1/64th of an inch, but it still cut way too deep into the wood since
the splice area was so small theere wasn't enough surface area
to keep the planer flat. Ended up using a sharp hand chisel to finish the job of cutting layers of ply away evenly. |
 |
 |
 |
 |
| 06/09/13 |
1.0 |
1264.8 |
Marked and removed layers of plywood from
the right wing aft -46 cap, this time using my die grinder with a carbide burr. Very easy to remove a layer of plywood at a time until
proper fit of the cabane fitting is acheived. Used a hand file in the corners and to radius the long edges to match the fitting. |
 |
 |
 |
 |
| 06/29/13 |
1.5 |
1266.3 |
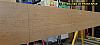
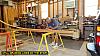
Had to move the top wing out of my barn to make way for my dad's motorhome. My friend Don is
graciously allowing me to build it in his shop downtown. I cleaned up everything and put
the wing on top of the truck for it's relocation. While I'll have to drive
about 5 minutes each way, it will be nice to spend more time with my friend, and also work in an area
with plenty of access. |
 |
 |
| QTR TOTAL |
38.8 |
|
|
2ND QTR 2013
|
•
•
•
|


