|
1ST QTR 2013
|
 •
•
 •
•
 •
•

|
| DATE |
HRS |
TTD |
ACTION |
IMAGES |
| 2/17/13 |
3.5 |
1198.9 |
Back on the project again. Moved the sawhorses out to the barn where I have more room and started placing
and leveling them. Center two are 72" apart and the outboard ones are 68" away.
|
 |
| 2/23/13 |
3.0 |
1201.9 |
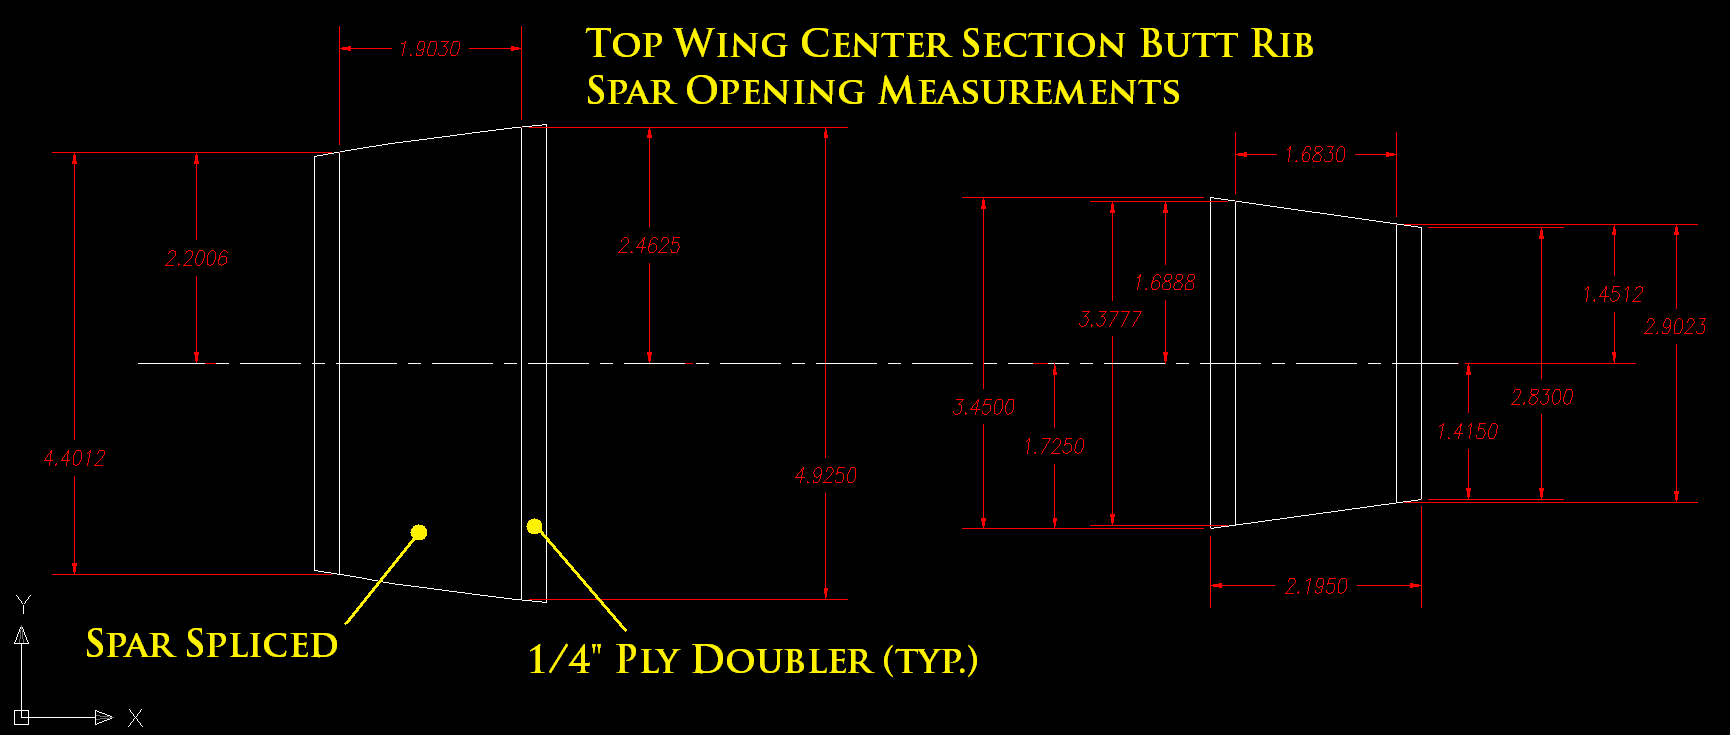
Measured the spar openings in both of the center section butt ribs and made a drawing so
I could figure out how much to sand down the splice areas so the butt ribs would slide on. Starting on the front spars first,
I measured and drew pencil lines on the spars to make sure I respected the spar centerline as I removed material. Got both ribs
to fit on the front spars.
|
 |
 |
 |
 |
| 2/26/13 |
2.5 |
1204.4 |
Measured and drew pencil lines on rear spar splices. Removed material from the right splice (the one I cut the ply doubler
off earlier) until I could slip the butt ribs into the center section.At first it looks like the rib will never fit over the splice,
but by tipping the rib as shown in the picture, it goes into position easily when the proper dimension of the spar splice is acheived.
|
 |
 |
| 2/27/13 |
3.2 |
1207.6 |
Worked on the left splice with both ply doublers on it. I had to sand down the faces of the plywood doublers a little bit,
and took care to get a nice snug fit of the rib.
|
 |
 |
 |
 |
| 03/08/13 |
1.0 |
1208.6 |
Got all the upper wing ribs out and sorted them out according to plans.I then labeled them with small pencil marks to
hopefully keep me from making a mistake when working with them. I found that I had two "right" -12 compression
ribs with single nose ribs, normally the single nose rib would be to the inner side of the rib. After asking Kevin
about it, it will be ok to have the left -12 rib with its nose rib 1/4" outboard of where it normally would be.
When the nose ribs are sanded prior to leading edge installation it will be brought down to the correct height. |
 |
 |
 |
 |
| 03/09/13 |
2.2 |
1210.8 |
Using strips of sandpaper glued to strips of aluminum, I adjusted the spar openings in the ribs a little
so they could slide onto the spars. Once I get all of them done then I will cut a 7 degree bevel in so
they can be oriented parallel to the center section ribs. Today I got the left wing front spar openings done. |
 |
 |
| 03/18/13 |
3.0 |
1213.8 |
Fit all the right wing front spar openings, then did all the aft openings. |
 |
 |
 |
 |
| 03/19/13 |
3.2 |
1217.0 |
Using Jasco paint remover I stripped gray paint from just about all the upper wing metal parts. |
 |
 |
| 03/20/13 |
2.0 |
1219.0 |
Went over to Ken's and bead blasted the metal parts and then took them over to Fusion
Coatings for powdercoating. |
 |
| 03/22/13 |
4.0 |
1223.0 |
Using a slab of particleboard and screwblocks on the
Bridgeport, I made a jig to hold the ribs. Marked the tops of the ribs
with pencil where the 7 degree chamfer was needed to avoid mistakes. I then used a 14
degree carbide point burr to cut the chamfer half-way into the
rib depth. Got the front spar openings done on all the truss ribs. |
 |
 |
 |
 |
| 03/27/13 |
2.0 |
1225.0 |
Finished the front spar openings and completed the aft spar openings
on the compression ribs. |
 |
 |
| 03/28/13 |
1.5 |
1226.5 |
Finished up cutting the chamfers in the aft spar openings of the truss ribs. |
 |
| 0402/13 |
1.0 |
1227.5 |
Since I was using a round bit to cut the chamfers, the corners were not done. So I used a
triangle file and cleaned up the corners of the spar openings by hand and made
sure each rib slides on the spars at the 7 degree angle |
 |
| QTR TOTAL |
32.1 |
|
|
1ST QTR 2013
|
•
•
•
|


